
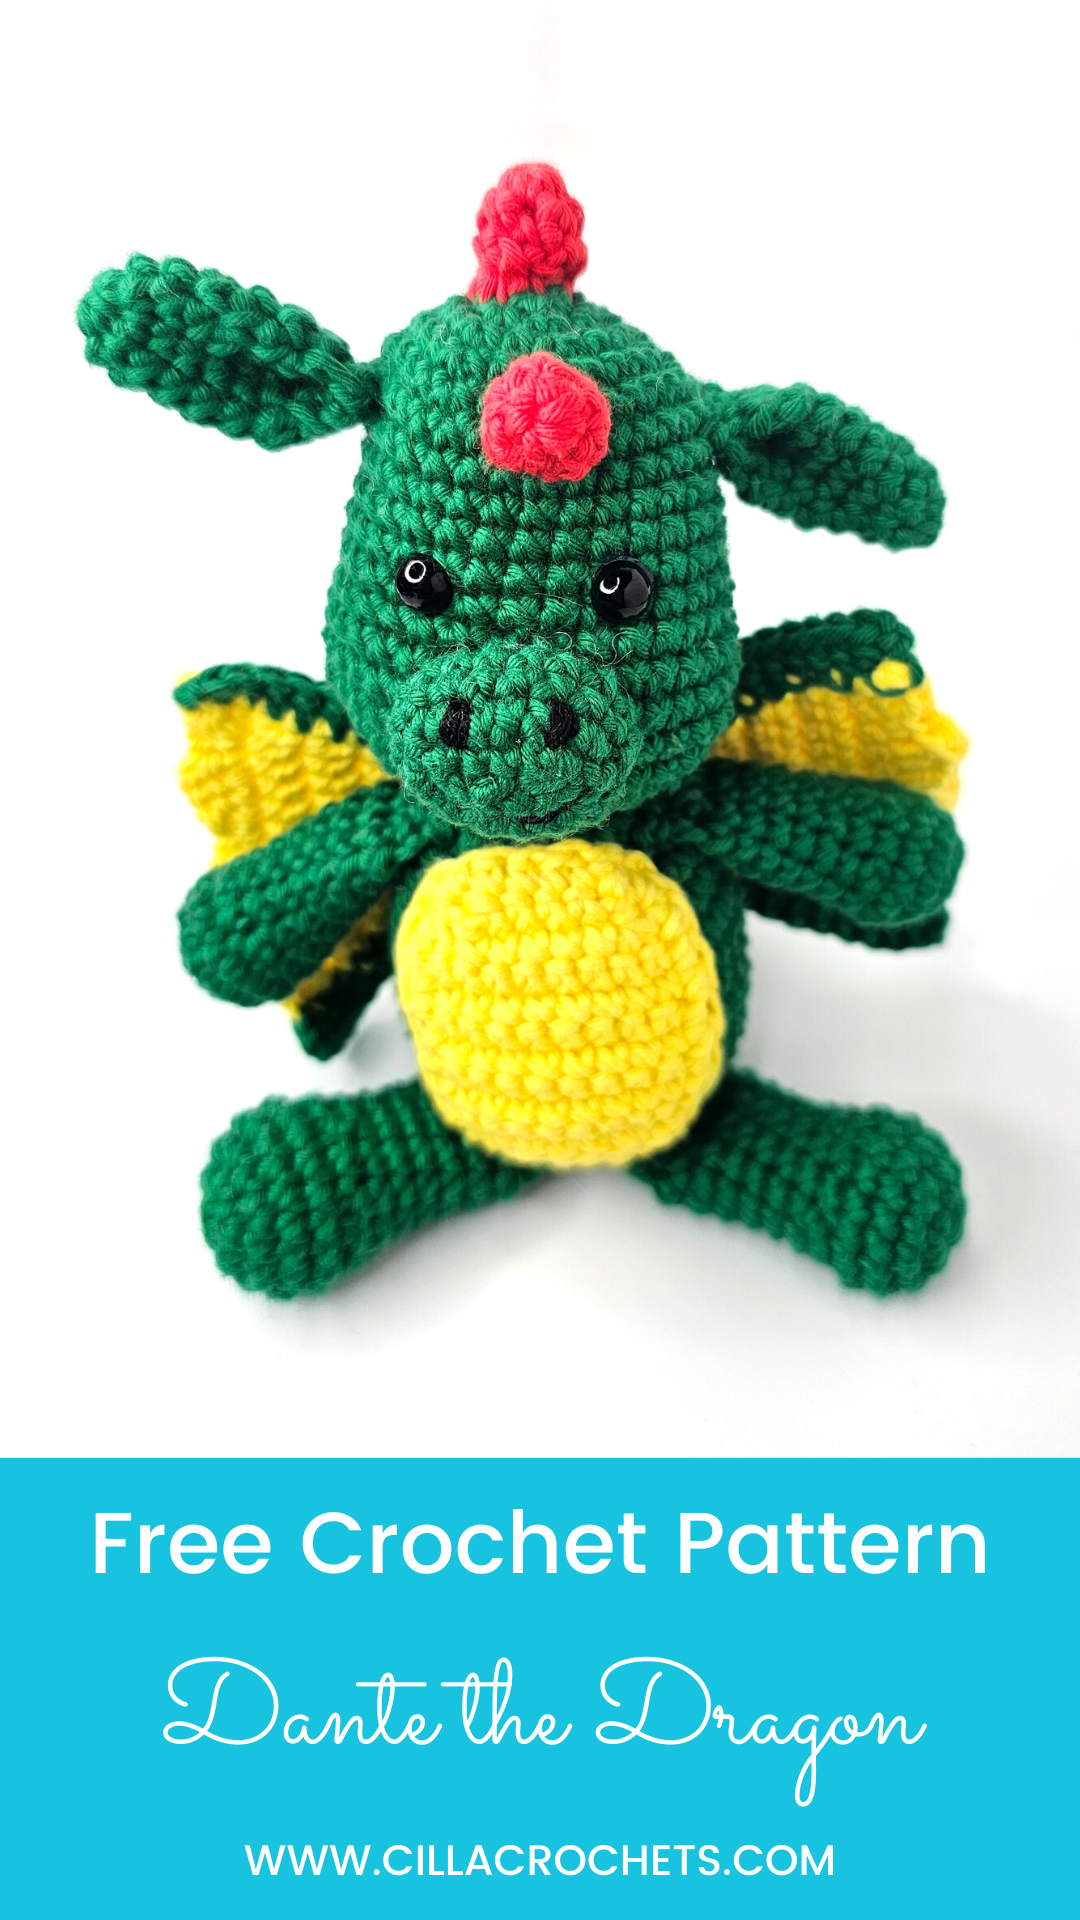
Free Dragon Crochet Pattern
Use this free crochet pattern to crochet Dante the Dragon - an adorable little dragon amigurumi.
This free dragon crochet pattern was designed to celebrate the year of the dragon, and I am so unbelievably pleased with how this little one turned out!
Dante the Dragon is a little amigurumi made using worsted weight yarn and a 4mm crochet hook. While the dragon amigurumi pieces are super simple to make, the assembly does require a little more concentration, but the end result is definitely worth the effort. I hope you’ll agree!
Below you’ll find the full free crochet pattern to make Dante the Dragon. If you would prefer to avoid the ads on my website, there’s also the option to buy an ad-free version of the dragon crochet pattern in any of my online stores.
Without further ado, I hope you enjoy this free dragon crochet pattern!
Prefer the ad-free crochet pattern?
If you’d prefer to avoid the ads on my website and would like a downloadable and nicely formatted crochet pattern for Dante the Dragon, you can purchase the crochet pattern on Ravelry, Etsy, Lovecrafts and Ribblr.
Dante the Dragon Pattern Information
Materials needed
Worsted weight yarn in three colours of your choice. For reference, I used Rico Creative Cotton Aran. The colours I used are listed below along with the amounts of yarn I used of each colour in brackets.
Colour A - Green (56 grams = 95m / 104 yds)
Colour B - Yellow (12 grams = 21m / 23yds)
Colour C - Red (12 grams = 21m / 23yds)
Crochet hook size 4 mm (G)
Stuffing
Needle
Scissors
Pins
Stitch marker
Safety eyes 8 mm or additional black yarn/embroidery thread for eyes
Amigurumi Dragon Size
Using the specified yarn in the materials list and a 4 mm (G) hook, the amigurumi turned out to be 16 cm / 6.3 " high when seated (from bottom to top of spike) and 13 cm / 5.1 " wide (wing width). Please note the size of your make will vary depending on your hook size, the yarn you use, and your tension/gauge.
Gauge
Gauge is not required for this pattern, however for reference my gauge for Dante the Dragon was as follows:
11 sc stitches on 5 cm / 1.96 "
11 rows on 5 cm / 1.96 "
Crochet pattern abbreviations
This crochet pattern is written in US terms.
R# - Row/round number
st - Stitch
ch - Chain
sl st - Slip stitch
mc - Magic circle
sc - Single crochet
hdc - Half double crochet
dc - Double crochet
inc - Increase
dec - Decrease
FLO - Front loop only
[...] x ... - Repeat the sequence of stitches in brackets x-times
(...) - Total number of stitches at the end of each row/round
Crochet top tips and additional pattern information
Pattern level: Intermediate
Yarn: The yarn choice is completely up to you, and you can change the yarn weight, material, and colours based on your own personal preference. Just be aware that the weight of your yarn may impact the hook size you need to use and also the size of your final make.
Hook size: I recommend using a smaller hook size than recommended on the yarn label. This will stop the stuffing appearing through your stitches.
Eyes: Please note that safety eyes are a choking hazard and are not suitable for children under 3 years of age. As an alternative, use additional black yarn to crochet or embroider the eyes.
Working in rounds: All parts within this pattern are worked in continuous rounds unless otherwise stated.
Stitch marker: Use a stitch marker at the beginning of each round to keep track of the number of stitches in each round.
Stuffing: Unless otherwise stated, stuff all amigurumi parts firmly as you crochet.
Decreases: I recommend using invisible decreases throughout.
X-shaped single crochet: While not mandatory, I recommend using the X-shaped single crochet st for this pattern. To do this, simply yarn under instead of over when hooking onto your yarn and when pulling yarn through your stitches.
Copyright: You are more than welcome to sell your crocheted creations using this pattern on a small scale. However, the pattern itself cannot be reproduced, sold, or redistributed in any way without the designers’ consent. For more information, please read the full copyright notice at the bottom of this page.
Dante the Dragon Crochet Pattern
Head
Using Yarn Colour A (Green).
R1: mc with 6 sc (6)
R2: [inc] x 6 (12)
R3: [sc, inc] x 6 (18)
R4: [2 sc, inc] x 6 (24)
R5: [3 sc, inc] x 6 (30)
R6 - 11: sc around (30) - 6 rounds
R12: [5 sc, inc] x 5 (35)
R13: [6 sc, inc] x 5 (40)
R14 - 15: sc around (40) - 2 rounds
R16: [6 sc, dec] x 5 (35)
Insert safety eyes between R10 & R11 with 5 sts in between each eye. Alternatively, embroider the eyes.
R17: [5 sc, dec] x 5 (30)
R18: [3 sc, dec] x 6 (24)
R19: [2 sc, dec] x 6 (18)
Stuff firmly.
R20: [sc, dec] x 6 (12)
Finish stuffing.
R21: [dec] x 6 (6)
Cut yarn leaving a short yarn tail (10 - 15cm) for sewing and fasten off. Using a tapestry needle, weave the yarn tail into the FLO of the final 6 sc sts and pull tight to close the gap. Weave yarn tail into the head to hide. See completed head in the image below.

Mouth
Using Yarn Colour A (Green).
Start: Ch 5
Crochet around both sides of the ch in R1.
Sl sts and chs are not counted in the total stitch counts.
R1: Start in 2nd ch from hook with 2 sc, sc in next 2 chs, 4 sc in last ch, turn to crochet along other side of ch, sc in next 2 chs, 2 sc in last ch, sl st to 1st sc in round (12)
R2: ch 1, 2 sc in first st, sc in next 4 sts, 2 sc in next 2 sts, sc in next 4 sts, 2 sc in next st, sl st to 1st sc in round to join (16)
R3 - R4: ch 1, sc around, sl st to 1st sc in round to join (16) - 2 rounds
Cut yarn leaving a longer yarn tail for sewing and fasten off. Weave in starting yarn tail.
Body
Using Yarn Colour A (Green).
R1: mc with 6 sc (6)
R2: [inc] x 6 (12)
R3: [sc, inc] x 6 (18)
R4: [2 sc, inc] x 6 (24)
R5: [3 sc, inc] x 6 (30)
R6: [4 sc, inc] x 6 (36)
R7 - R10: sc around (36) - 4 rounds
R11: [4 sc, dec] x 6 (30)
R12 - R13: sc around (30) - 2 rounds
R14: [3 sc, dec] x 6 (24)
R15: sc around (24)
R16: [2 sc, dec] x 6 (18)
R17: [sc, dec] x 6 (12)
R18: sc around (12)
Stuff piece firmly.
Cut yarn leaving a longer yarn tail for sewing and fasten off.
Legs (Make 2)
Using Yarn Colour A (Green).
R1: mc with 6 sc (6)
R2: [inc] x 6 (12)
R3: [sc, inc] x 6 (18)
R4 - R5: sc around (18) - 2 rounds
R6: [sc, dec] x 6 (12)
R7: sc around (12)
Stuff foot firmly.
R8 - R12: sc around (12) - 5 rounds
Stuff leg lightly to the top.
R13: ch 1, hold both sides of the leg together and 6 sc across into both sides to join them together (6)
Cut yarn leaving a longer yarn strand for sewing and fasten off.
Repeat steps above to make a second leg.
See completed legs in the image below.

Arms (Make 2)
Using Yarn Colour A (Green).
R1: mc with 6 sc (6)
R2: [inc] x 6 (12)
R3: [3 sc, inc] x 3 (15)
R4: sc around (15)
R5: [sc, dec] x 5 (10)
R6: sc around (10)
Stuff hand firmly.
R7 - R11: sc around (10) - 5 rounds
Stuff arm lightly to the top.
R12: ch 1, hold both sides of arm together and 5 sc across into both sides to join them together (5)
Cut yarn leaving a longer yarn tail for sewing and fasten off.
Repeat the steps above to make a second arm.
Ears (Make 2)
Using Yarn Colour A (Green).
Do not stuff.
R1: mc with 6 sc (6)
R2: [inc, 2 sc] x 2 (8)
R3: sc around (8)
R4: 2 sc, inc, 5 sc (9)
R5: 5 sc, inc, 3 sc (10)
R6: inc, 9 sc (11)
R7: 5 sc, inc, 5 sc (12)
In R8, we crochet the ear shut.
R8: Ch 1, Hold sides of ear together and crochet into both sides of the ear with 6 sc, so the ear is now closed (6)
R9: Ch 1, Fold ear in half again and crochet into both sides of the ear with 3 sc (3)
Cut yarn leaving a longer yarn tail for sewing and fasten off.
Repeat steps above to make a second ear. See completed ears in image below.

Spikes (Make 8)
Using Yarn Colour C (Red).
Do not stuff.
R1: mc with 5 sc (5)
R2: inc, 4 sc (6)
R3: 3 sc, inc, 2 sc (7)
Cut yarn leaving long tail for sewing and fasten off.
Repeat steps above to make 7 more spikes (8 spikes in total).
See completed spikes in the image below.

Tail
Using Yarn Colour A (Green).
As this will be the end of the tail that is sewn to the body, leave a longer yarn tail for sewing before you start your chain.
Start: Ch 24, sl st to first ch to form a loop
R1: ch 1, sc in same st as sl st, sc in next 23 chs, sl st to first sc to join (24)
R2: ch 1, sc around (24)
From here we start working in continuous rounds (no slip stitch or chain).
R3: [4 sc, dec] x 4 (20)
R4 - R5: sc around (20)
R6: [3 sc, dec] x 4 (16)
R7 - R9: sc around (16)
R10: [2 sc, dec] x 4 (12)
R11: sc around (12)
R12: [4 sc, dec] x 2 (10)
R13: sc around (10)
R14: [3 sc, dec] x 2 (8)
R15: [2 sc, dec] x 2 (6)
R16: [sc, dec] x 2 (4)
Cut yarn leaving a short tail for sewing and fasten off. Using a tapestry needle weave the end yarn tail through last 4 sts and pull tight to close.
Stuff tail lightly.
See completed tail in the image below.

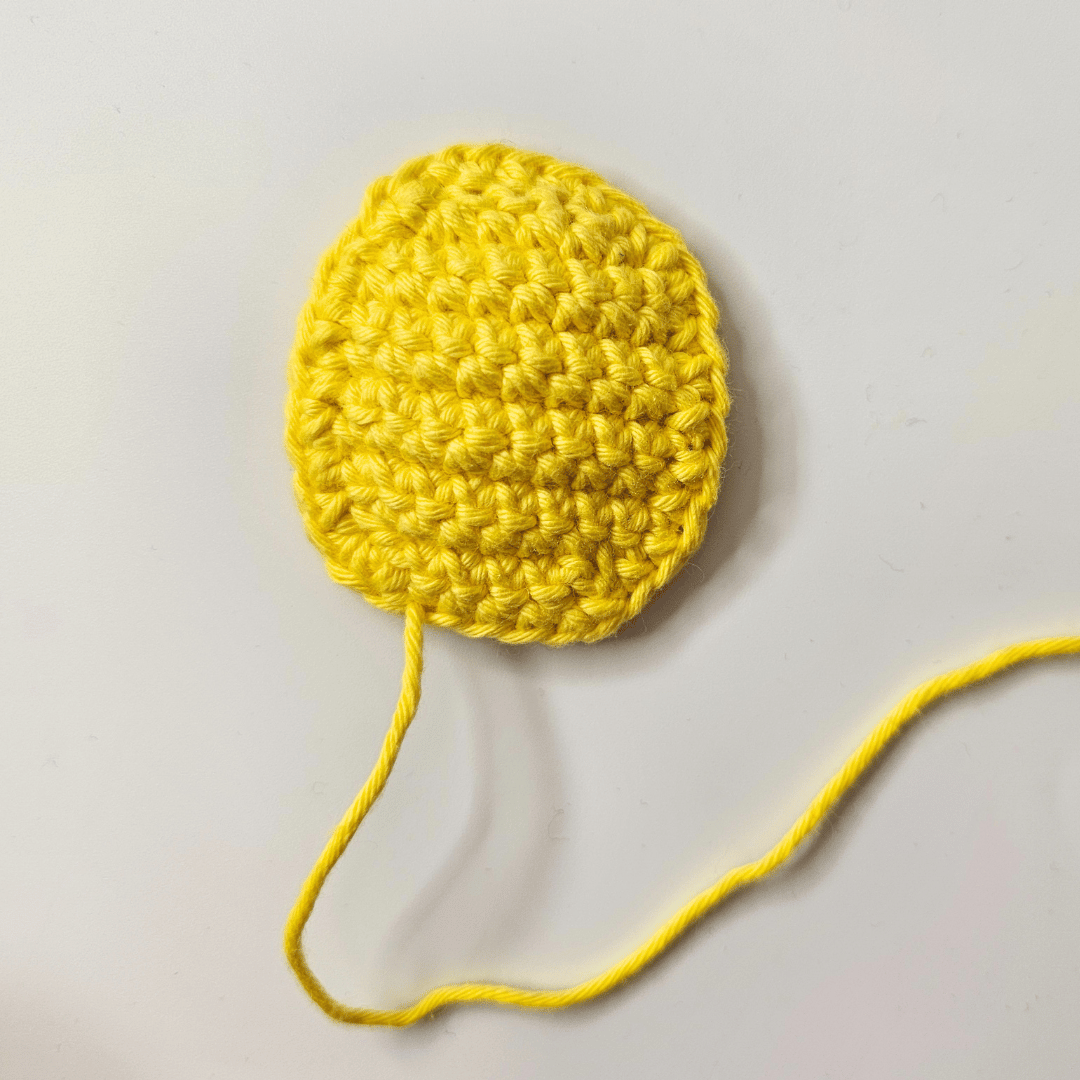
Tummy patch
Using Yarn Colour B (Yellow).
This piece is crocheted back and forth in rows. Turning chs are not counted in the total stitch count of each row. Check st tension is the same as your other pieces that are crocheted in the round.
Start: Ch 6
Turn to work back along the chain.
R1: Start in 2nd ch from hook and sc in each ch across, ch 1, turn (5)
R2: inc, 3 sc, inc, ch 1, turn (7)
R3: inc, 5 sc, inc, ch 1, turn (9)
R4 - R7: sc across, ch 1, turn (9) - 4 rounds
R8: dec, 5 sc, dec, ch 1, turn (7)
R9: dec, 3 sc, dec, ch 1, turn (5)
In R10, we’ll crochet around all four sides of the crochet piece.
R10: sc in next 4 sts, inc in last st, turn to crochet along the first long side, 8 sc across and inc in last st on long side, turn to crochet along the starting ch, sc in next 4 chs and inc in the last ch, turn to crochet along the second long side, 8 sc across and inc in last st, sl st to first sc (32) - sl st isn’t counted in total st count
Cut yarn leaving a longer yarn tail for sewing and fasten off. I recommend using an invisible fasten off, but this isn’t mandatory. Sew the little starting yarn tail in.
See completed tummy patch in the image below.
Wings (Make 2)
Using Yarn Colour A (Green) and Colour B (Yellow).
This piece is crocheted back and forth in rows. Turning chs are not counted in the total stitch count of each row.
Start with Yarn Colour B (Yellow).
Start: Ch 7
R1: Start in 2nd ch from hook & sc in next 6 sts, ch 1, turn (6)
R2: inc, 4 sc, inc, ch 1, turn (8)
R3: 8 sc, ch 1, turn (8)
R4: inc, 6 sc, inc, ch 1, turn (10)
R5: 10 sc , ch 1, turn (10)
R6: inc, 8 sc, inc, ch 1, turn (12)
R7: 12 sc, ch 1, turn (12)
R8: 12 sc, ch 3, turn (12)
R9: [dc, hdc & sc in next st, sc & hdc in next st, dc] x 3 (18)
Cut yarn and fasten off.
In R10, we’ll crochet around the three straight sides of the wing with two rows of Yarn Colour A (Green) yarn. As such, a total stitch count hasn’t been included to avoid any confusion.
Attach Yarn Colour A (Green) to 1st st in starting ch as shown in the image below.

R10: ch 1, sc in same st, sc in next 4 sts, inc in last st, turn to work down the long side and sc in next 9 sts, inc in next st, ch 1, turn to work back down the long side and sc in the next 11 sts, sc in next 7 sts across the bottom of the wing, ch 1 and turn to work up the other long side and sc in next 12 sts, ch 1, turn to work back down the same side and sc in next 12 sc, sl st to the closest sc on short side
Cut yarn leaving a longer yarn tail for sewing and fasten off. See image below. Repeat steps above to make a second wing.

Dante the Dragon Assembly Instructions
Step 1: Sew mouth to head
Using the yarn tail from the mouth piece, sew the mouth piece to the head. The top of the mouth piece sits between R11 & R12 of head. The bottom of mouth piece sits between R15 & R16 of the head. See image 23 (images are below step 6).
Step 2: Sew ears to head
Sewing the yarn tail from the ears, sew the ears to either side of the head as shown in image 24 and 25. The ears sit between R6 & R7 of head with approximately 13 sts in between the ears at the front of the head.
Step 3: Sew body to head
Using the yarn tail from the body, sew the body to the bottom of the head. The body sits between R20 & R21 of the head. See image 26.
Step 4: Sew tummy patch to body
Using the yarn tail from the tummy patch, sew the tummy patch to the front of the body. The tummy patch sits over R7 to R18 of the body as shown in image 27 and 28.
Step 5: Sew legs to body
Using the yarn tail from the legs, sew the legs to front of body between R5 & R6 with approximately 3 sts between the middle of the legs at the front. See image 29 and 30.
Step 6: Sew arms to body
Using the yarn tail from the arms, sew the arms to each side of the body. The arms sit on a slight angle with the front st of the arm sitting between R17 and R18, and the back st of the arm sitting between R17 and R16. See image 31 and 32 for placement.

Step 7: Sew tail to back of body
Using the yarn strand from the tail, sew the tail to the back of the body over R5 to R11 as shown in image 33, 34 and 35 (images are below step 10).
Step 8: Sew wings to back of body
Start by weaving in all yarn tails except for the long yarn tail you ended the piece with. See image 36. This long tail will be used for sewing. Now sew the wings over R10 to R16 of the body at the back. The top inner corners should almost touch and the bottom inner corners are separated by approximately 4 sts. See image 37 and 38.
Step 9: Sew the spikes to the head, body and tail
Pin the 8 spikes evenly in a line from the front of the face (above the eyes), up and over the head, down the back (between the wings), and down to the tip of the tail. Use the yarn tail from each spike to sew them in place. See image 39 and 40.
Step 10: Embroider the nose and mouth
Using a little bit of black embroidery thread, embroider 2 nostrils and a little mouth on the mouth piece as shown in image 41.


Congratulations, you’ve finished crocheting your Dante the Dragon!
I hope you’ve enjoyed this free dragon crochet pattern.
I’d absolutely love to see your creations and share them with the crochet community. You can share your makes with me by posting a picture on social media using the hashtag #CillaCrochets and by tagging me @cillacrochets. I’ll also see your makes if you upload a project (with a photo) to Ravelry linking to my pattern.
Until next time, happy crocheting,
Cilla x
Copyright notice
© 2024 Cilla Crochets. Cilla Richards - All rights reserved. This pattern is for personal use only.
The pattern (or parts of it) may not be reproduced, distributed or resold, translated, published, altered, shared, or posted (for sale or for free) over the internet or offline.
You can sell items made from this pattern if they are handmade by yourself in a limited number and you give credit to the designer. Please add the following text to your item description for any item designed by Cilla Crochets/Cilla Richards that you are selling:
“This product is handmade by [your name] from a design and pattern by Cilla Richards at Cilla Crochets. See www.cillacrochets.com for more information.”