
Magic circle tutorial for crochet
Learn how to start off your crochet project with this step-by-step magic circle tutorial for beginners.
If you’ve struggled with the magic circle, please know that you’re not alone! And if you’re a brand new crocheter, a big warm welcome to you.
Whether you’re a seasoned crocheter who has been avoiding the magic circle or a beginner learning the ropes (or I should say yarn 🙃), it’s fantastic to have you here and I have no doubt you’ll pick up this technique in no time!
So before we begin, let’s talk about what a magic circle actually is…
What is a magic circle?
A magic circle is a way to start your crochet project when working in the round (i.e. crocheting around in circles as opposed to going back and forth in rows). This technique, when done correctly, will connect the yarn to your crochet hook and create a loop of yarn right next to your crochet hook for you to crochet your first round of stitches into. This loop can then be closed tightly by simply pulling on a little strand of yarn coming from the circle. It’s all pretty magical, thus the name. 😉
Now, if you’re finding it a little difficult to imagine what this might look like, here are three photos below that show the ‘magic’ of the magic circle.

Working from left to right, the first picture shows what the magic circle looks like before you start crocheting. The second/middle image shows the stitches crocheted onto the magic circle. The last image shows you what the magic circle looks like once it has been closed. At this stage, you would start crocheting your second round.
Before we move on, I should mention that there are SO many different names for the magic circle, including: Magic Ring, Magic Loop, Adjustable Loop, Miracle Ring, Miracle Circle, Cinch Circle, Adjustable Magic Ring, Adjustable Ring, and you get the jist… In saying this, the most common names I’ve come across are the Magic Circle/Ring/Loop, but it’s helpful to know that there are many others out there, just in case you come across one of these terms in a pattern one day. For the purposes of this tutorial however, I’ll be sticking to the term I use the most, which is the ‘Magic Circle’.
Now let’s get right into showing you how to make one!
How to make a magic circle
Let’s me show you how to make a magic circle. After all, that’s what you came to this post for, wasn’t it? 🙃
To follow along with this tutorial, you’ll need:
Yarn - I’m using Rico Design Creative Cotton Aran. If you’re new to crochet, I do recommend using a worsted weight yarn to start with. If you’re not new to crochet, grab any yarn that you’re comfortable crocheting with.
Crochet Hook - For this tutorial, use a crochet hook size that corresponds to your yarn weight. You can check the back of your yarn label if you’re unsure. For reference, I’m using a 4mm with my Aran weight (worsted weight equivalent) yarn.
Tapestry Needle - This is for the bonus top tip to keep your magic circle secure.
This magic circle tutorial has been broken down into four parts, just to make it a little easier to read and understand. The first part requires you to just use your hand and yarn, the second part is when you’ll use your crochet hook (but have it ready in part 1), the third part is when you’ll start crocheting (make sure you already know how to single crochet in US terms), and the last part is a bonus to help your stitches stay secure, which means you’ll need your tapestry needle. All four sections make up the magic circle process, but I hope this makes learning the steps a little bit easier.
Last but not least, before we get started, I do recommend giving the four parts a quick read in advance of giving them a go. It will help in the process, I promise!
Let’s get to it…
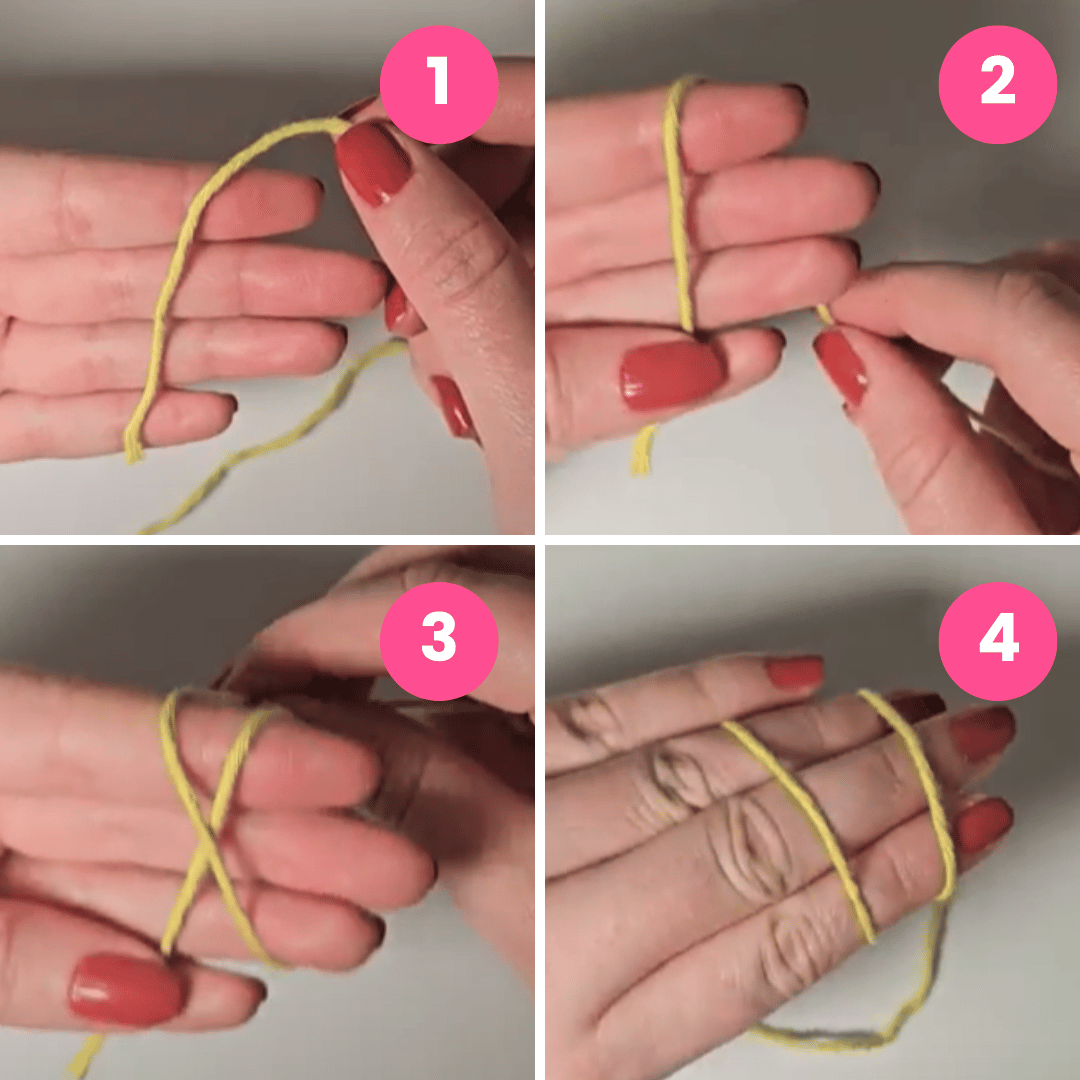
Part 1: Wrapping the yarn around your fingers
In part 1 and 2, we’re going to create our ‘magic circle’ knot - this is essentially instead of a slip knot except it’s adjustable and includes a loop! To do this, we’re going to wrap the yarn around three of our fingers so that one on side of our fingers the yarn strands are parallel, but on the other side of our fingers the yarn strands cross over. To do this, follow the steps below and take a look at the corresponding photos for each step below.
Step one: With the palm of your hand facing you, lay a strand of yarn across your fingers. Make sure the end of the yarn strand starts at the little finger and the part closest to the ball of yarn is the bit at the top of your index finger.
Step two: Hold the bottom of the yarn strand (the bit near your little finger) with your thumb and use your other hand to move the yarn around the back of your hand bringing it back to where you started (e.g. to where the end of the yarn strand is being held by your thumb).
Step three: Continue to wrap the yarn around the front (palm-face side) of your hand again, BUT move it over the first yarn strand so it creates an ‘X’ shape across the front of your three fingers.
Step four: Move the yarn straight across the back of your hand so it runs parallel to the first strand of yarn (no crossing over yarn here!). Use your little finger to hold this bit of yarn in place.
Now it’s time to get your crochet hook for part 2.
Part two: Creating the adjustable loop with your crochet hook
For these steps, you’ll need your crochet hook. This is the stage when we attach the yarn around our hand to our crochet hook and form an adjustable knot with a loop attached.
Step five: Insert your hook under the first yarn strand, hook on to the strand furthest away and drag it under the first yarn strand, as shown in the image below.

Step six: Lift your hook up so it’s grabbing onto the yarn you hooked onto in the step below, then move your hook (turning it clockwise if you’re right handed) so a twist forms in the yarn. You can see this full step in the image below.

Step seven: Using your hook reach over the 1st yarn strand and grab on to a section of the same yarn strand your hook is already attached to. See the first image below. Hook on to this bit of yarn, lift your hook up, then pull it through the loop that’s on your hook.

Step 8: The yarn is now attached to your hook with a little yarn loop formed from the knot. First thing is first, make sure the little yarn strand isn’t tangled around the loop (see the first and second image below). Secondly, secure the knot around your hook, by pulling on the long yarn strand that’s coming from your ball of yarn.

Now we’re ready to do some actual crocheting!
Part 3: Crocheting stitches into your magic circle
Now that we’ve created the magic circle, we need to add our crochet stitches for the first round of our project into it.
Most projects will specify the type of stitch and how many to create in the magic circle. In a written pattern, this will normally be written as part of the first round instructions. For example, in my patterns I would write something like ‘R1: mc with 6 sc’, which means ‘Round 1: magic circle with 6 single crochet’ (this is in US terms).
P.S. If you need any help reading crochet patterns, I have a post on that too.
If you’re making amigurumi, the most common way of starting an amigurumi piece is with 6 single crochet (however, I’ve also seen 4 sc and 8 sc quite regularly). Depending on your project however, this could be a different type of stitch or different number of stitches, but overall the principle I’ll show you here is the same.
Step 9: Assuming that we need to start with single crochet (in US terms) stitches in the magic circle, you insert your hook into the yarn loop and complete a single crochet as you normally would. The big difference is that instead of inserting your hook into a stitch, you’re inserting it into the yarn loop instead. The most important point to remember here is to ensure you crochet over BOTH the loop and the little yarn strand (not the one attached to the ball of yarn/you’re working yarn, but the little yarn strand that ends). The image below demonstrates this in five steps, which are:
(1) insert hook into yarn loop and yarn over
(2) bring yarn back up through the magic circle so you have 2 loops on your crochet hook
(3) yarn over again (this is where you need to make sure the little yarn strand is in between your hook and the working bit of yarn you’re grabbing when you yarn over - see 3rd image for this one)
(4) pull through both loops on your hook
(5) shows 1 completed single crochet

Step 10: Crochet the total number of stitches you need for your first round just like you did with the first single crochet above in step 9. In this example image below, I’ve crocheted 6 single crochet stitches into my magic circle. Once these stitches are done, you can pull the little yarn tail which will close the magic circle and bring your stitches close together.

Now that is essentially you’re magic circle done! However… I’ve got an extra part to this, simply because I was a bit frustrated when I first started crocheting that none of the magic circle tutorials I read or watched included this step. And, dare I say, part 4… while obvious to some, was not obvious to be as a brand new beginner crocheter. So let me fill you in, in case you’re in that same boat.
Part 4: Securing your magic circle
The last part is to secure your magic circle. This simply means, that if you leave your magic circle as is, without securing it in any way, it will most likely start to come undone over time (it’s happened to my first ever ami!). Now, there are a few ways to secure your yarn tail into a magic circle, but I’m just going to share the way I do it here… more methods may come in a future post.
Once I reach the second or third round, I grab a tapestry needle out and sew the little yarn tail through the stitches of the magic circle one way, then I turn to go back in the other direction, skipping a stitch first so my sewing doesn’t come undone. The reason I tend to do this on the second or third round is that doing it straight away (after making the magic circle) can make crocheting the second round a little more difficult. That’s what I’ve personally found anyway.
And that’s all there is to it! I sincerely hope this blog post has helped you learn how to do a magic circle. I know there are a lot of people out there that struggle with this technique, so if this is you, and this post has helped demystify the whole method for you, please do let me know, I’d love to hear from you!
If, however, you’re still struggling with coming to grips with the magic circle, comment below and let me know what part or step you’re struggling with. I’ll see if I can help!
Until next time, happy crocheting,
Cilla x