
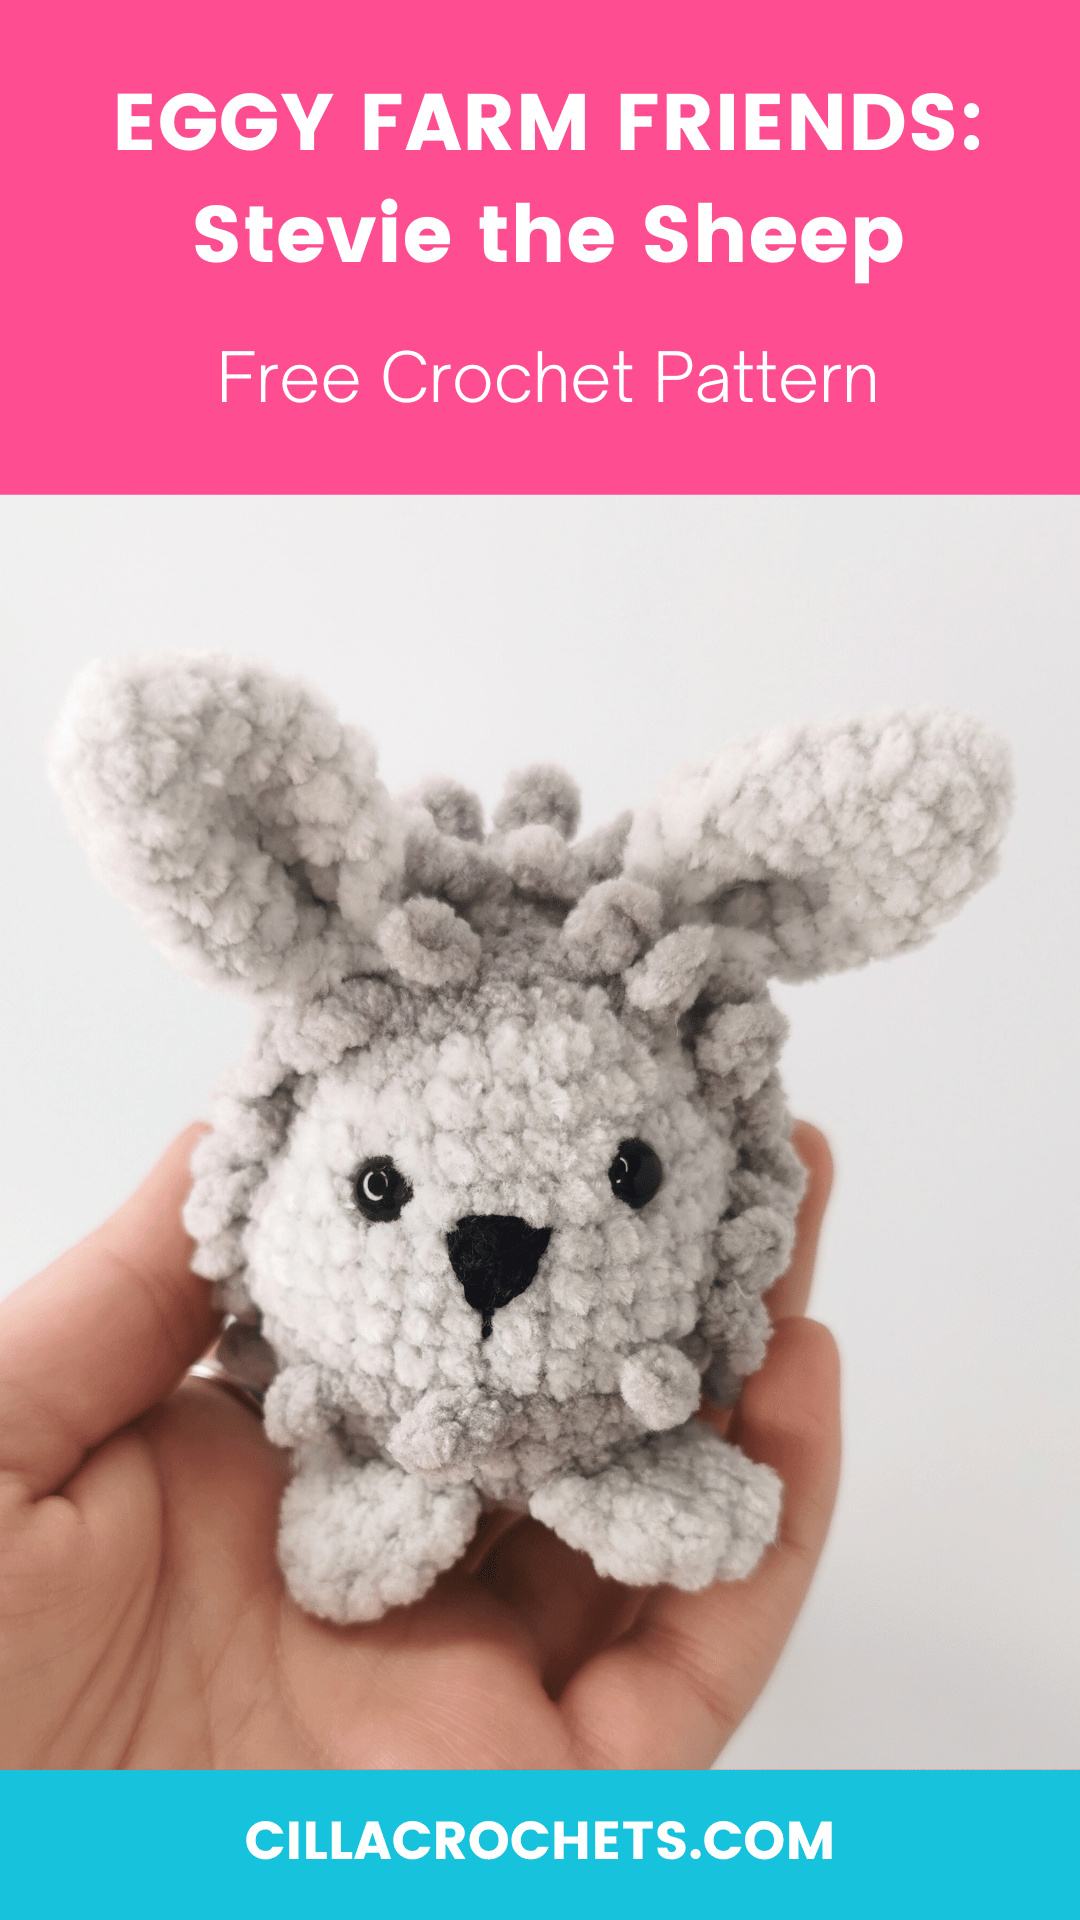
Stevie the Sheep free crochet pattern
This free crochet pattern for Stevie the Sheep makes an egg-shaped fluffy amigurumi and is an ideal crochet project in the lead-up to Easter.
Stevie the Sheep joins Hetty the Hen and Peter the Piglet as part of the Eggy Farm Friends Easter crochet collection.
This sheep amigurumi pattern is an intermediate level crochet pattern and does take a little bit longer to make than Hetty and Peter due to the fluffy wool created while you crochet. It is totally worth it though, Stevie is one cute sheep!
A huge benefit to this pattern is that minimal sewing is involved. The feet, tail, and ears are all crocheted on as you go, and in Stevie the Sheep’s case, even the wool is crocheted on as you go (you don’t need to reattach yarn and crochet over the base of the body). I can’t wait to share how this is done with you.
If you prefer to avoid the website ads, the PDF pattern for Stevie the Sheep is available to purchase on Etsy and Ravelry.
I hope you enjoy crocheting Stevie the Sheep and I’d absolutely love to see your makes once you’re finished! You can share photos with me on social media by tagging me @cillacrochets.
Happy Crocheting!
〰️
Happy Crocheting! 〰️
Sheep Crochet Pattern Information
Please read this section carefully before you start to crochet Stevie the Sheep.
Amigurumi size and gauge
Gauge is not required for this pattern. Using the crochet hook and yarn recommended in the materials list below, Stevie the Sheep’s body will turn out to be approximately 7 cm / 2.8 " high & 5 cm / 2 " wide. I do tend to crochet quite tightly however, so your Stevie may turn out slightly larger than this.
Materials you need to crochet Stevie the Sheep
Here is the list of materials you’ll need to crochet Stevie the Sheep:
Yarn: DK chenille yarn in two colours. I used Sirdar Happy Chenille in the following colours. Amounts are in brackets.
A - Dark Grey (9 grams = 22.8 m / 25 yds)
B - Light Grey (6 grams = 15.2 m / 16.6 yds)
Crochet Hook: size 2.5 mm (Use US B or C if 2.5mm is unavailable). If you decide to use a different yarn, use a hook size smaller than the size recommended on the yarn label. This will ensure your stuffing doesn’t appear through your stitches.
Other materials:
Stuffing
Needle
Scissors
Stitch marker
Safety eyes 6 mm
Pins (optional)
Black embroidery thread (optional)
Pattern abbreviations for Stevie the Sheep
Below is a list of the abbreviations used throughout Stevie the Sheep’s crochet pattern.
R# - Row/round number
st - Stitch
ch - Chain
sl st - Slip stitch
mc - Magic circle
sc - Single crochet
inc - Increase
dec - Decrease
sk - Skip
[...] x ... - Repeat the sequence of stitches in brackets x-times
(...) - Total number of stitches at the end of each row/round
cc# - Change colour to the yarn indicated (#), e.g. ccA = change colour to yarn A
Read this before you start crocheting
This crochet pattern is written in US terms.
Checking your gauge is not required. To ensure your stuffing doesn’t show through the stitches, use a hook that is smaller than the recommended size for your yarn weight.
Use a stitch marker throughout to keep track of your stitches.
All parts within this pattern are worked in continuous rounds unless otherwise stated.
Some body parts are attached to the body while you crochet. As a result, I recommend crocheting the feet, tail, and ears before you crochet the body. The no-sew technique is also explained clearly throughout the pattern.
Tag @cillacrochets and use the hashtag #CillaCrochets when sharing pictures on social media. I’d love to see your creations and share them with the community!
Easter Sheep Crochet Pattern
Let’s start crocheting Stevie the Sheep!
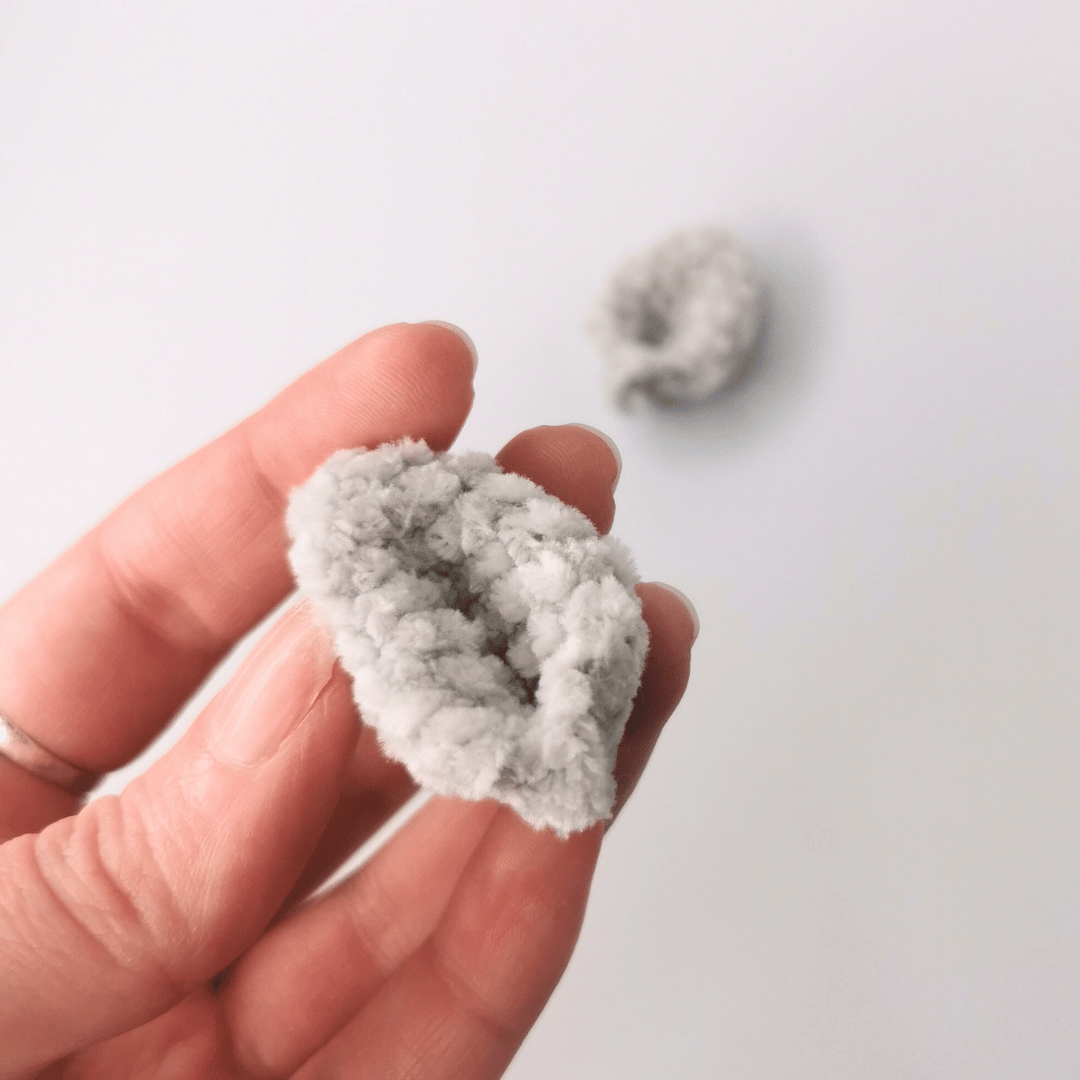
Feet (Make 2)
Using Colour B Yarn (Light Grey).
Do not stuff.
R1: mc with 5 sc (5)
R2: [inc] x 5 (10)
R3: sc around (10)
R4: hold sides together and join with 5 sc (5)
Cut yarn and fasten off.
Using needle, weave yarn tail into the foot to hide.
Repeat above steps to make a second foot.
See completed feet in the image below.

Tail
Using Colour B Yarn (Light Grey).
Do not stuff.
R1: mc with 8 sc (8)
R2: [sc, inc] x 4 (12)
R3: sc around (12)
R4: [sc, dec] x 4 (8)
R5 - R6: sc around (8) - 2 rounds
R7: hold sides together and join with 4 sc (4)
Cut yarn and fasten off.
Using a needle, weave yarn tail into the tail to hide.
See completed tail in the image below.

Ears (Make 2)
Using Yarn B (Light Grey).
Do not stuff.
R1: mc with 6 sc (6)
R2: [sc, inc] x 3 (9)
R3: [2 sc, inc] x 3 (12)
R4: [3 sc, inc] x 3 (15)
R5 - R7: sc around (15) - 3 rounds
R8: hold sides together and join with 7 sc leaving 1 unworked st from the previous round (7)
R9: ch 1, pinch ends of ear together so the last row folds in half and join with 3 sc leaving 1 unworked st from the previous round (3)
Cut yarn and fasten off.
Using a needle, weave the yarn tail into the ear to hide.
Repeat the steps above to make a second ear.
See completed ears in the images below.

Body
Using Yarn A (Dark Grey) and Yarn B (Light Grey).
Start with Yarn A (Dark Grey).
Stuff firmly throughout.
R1: mc with 8 sc (8)
R2: [inc] x 8 (16)
R3: [sc, inc] x 8 (24)
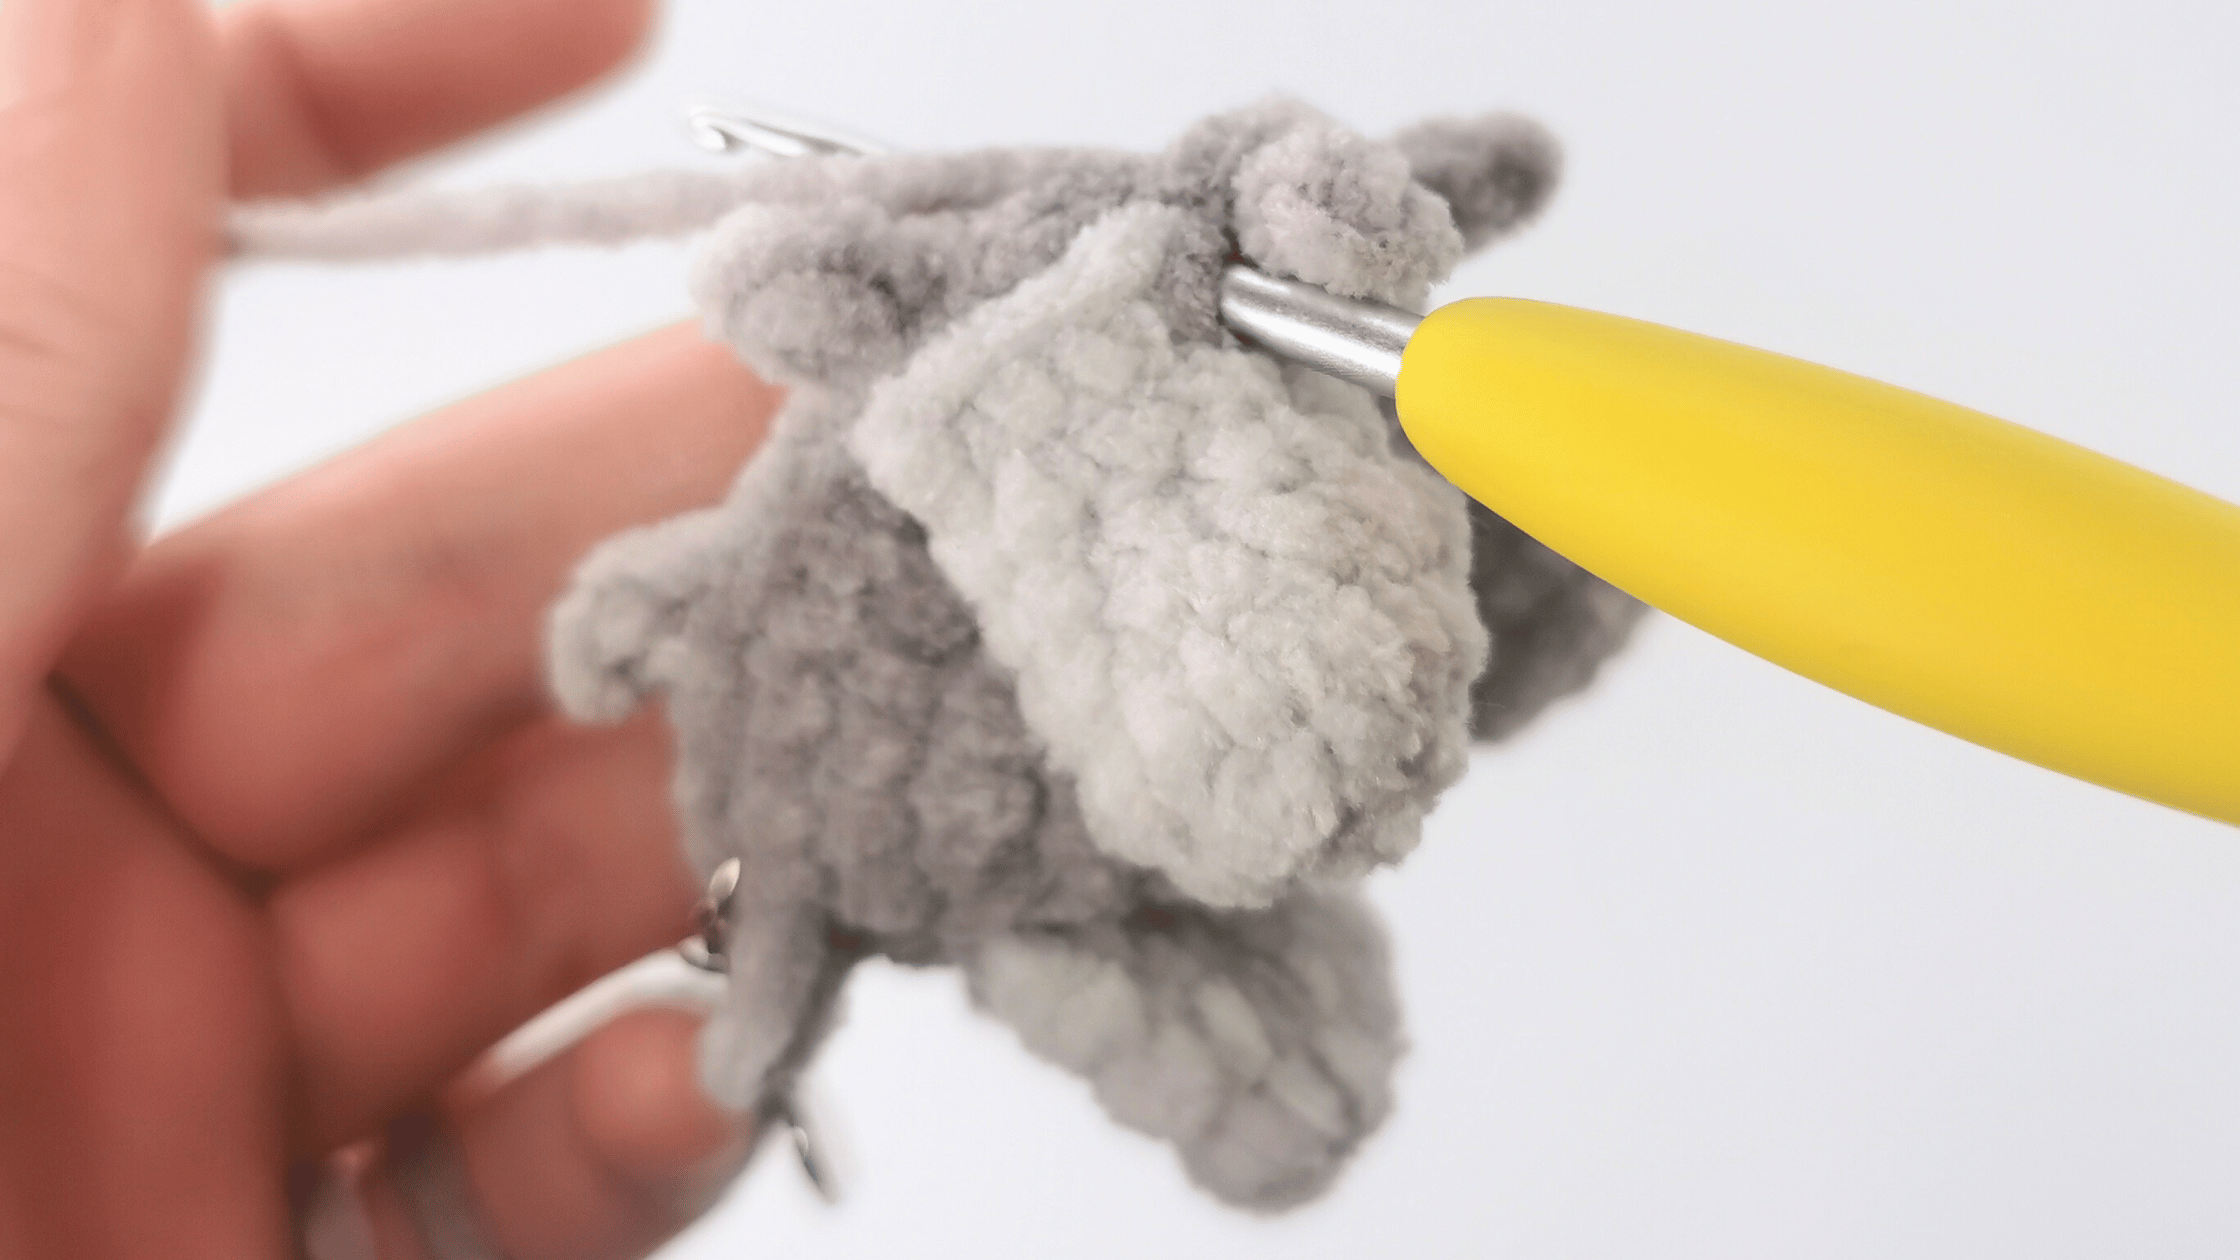
In the next round, you will attach the feet to the body while you crochet. To do this, line up the foot to the body when instructed to do so. *Insert your hook into the first st of the foot, then into the next st of the body. Complete sc as per normal. Repeat from * until all sts of the foot are crocheted to consecutive sts of the body (see images below).

R4: 1 sc, crochet foot to body with 5 sc, 1 sc, crochet other foot to body with 5 sc, 12 sc (24)
In the next round, you will start to crochet the wool of the sheep. Each stitch combination that creates the wool (the part that sticks out from the sheep’s body) will be written as 'wool' in the following rounds.
Each 'wool' stitch combination consists of: 1 sc, ch 3, start in second ch from hook and sl st in each ch, 1 sc back on body (2) - The ch and sl sts are not included in the total st count.
R5: [wool, inc] x 8 (32) - See image below

Please note: When crocheting above any rounds with 'wool' stitch combinations, ignore chs and sl sts and only crochet into the sc stitches. It’s very important to keep your stitch tension tight and consistent, so gaps don’t appear in your stitches where the stuffing could escape.
In the next round, the tail is crocheted to the body using the same technique you used to attach the feet. Skip wool chains and sl sts in R5 when crocheting R6 by only crocheting into the single crochet stitches.
R6: 22 sc around the body, crochet tail to body with 4 sc, 6 sc (32) - See image below.
In the next round, you will start to use colour changes to create the face. To ensure straight lines when changing colour, add the new colour in the last yarn over of the sc before the new colour is stated in the pattern.
R7: 2 sc, wool, 1 sc, ccB 9 sc, ccA 2 sc, [wool, 2 sc] x 4 (32)
R8: [wool] x 2, ccB 12 sc, ccA [wool] x 8 (32)
R9: sc, wool, ccB 13 sc, ccA [wool] x 8 (32) - See image below.

R10: wool, sc, ccB 13 sc, ccA sc, [wool] x 7, sc (32)
R11: [wool] x 2, ccB 12 sc, ccA [wool] x 8 (32)
R12: 2 sc, wool, ccB 12 sc, ccA sc, [wool] x 7, sc (32)
R13: wool, dec, ccB [2 sc, dec] x 3, ccA [wool, dec] x 4 (24)
R14: sc, [wool] x 2, ccB 5 sc, ccA [wool] x 7 (24)
If using safety eyes, insert them now between R11 & R12 of the head above the feet. There should be 5 sts between the eyes. See safety eye placement in the image below.

R15: [wool, dec] x 6 (18)
In R16, the ears are crocheted to the body using the same technique we used to attach the feet and the tail. The ears should sit on either side of the body with the feet in the middle. Ensure the open part of the ear is facing the front of the body (where the feet are).
See under R16 for the detailed st count I used. However, please note that placement of the ears is more important and this may need to be changed depending on your tension/positioning.
R16: sc around joining both ears to either side of the body as you crochet (18) - see image below.
Detailed st count for R16 (optional): Join ear to body with 3 sc, 4 sc, join ear to body with 3 sc, 8 sc (18)
R17: [sc, dec] x 6 (12)
R18: [wool] x 6 (12)
Finish stuffing.
R19: [dec] x 6 (6)
Cut yarn leaving a short tail for sewing. Using a needle, weave through FLO of final 6 sc. Pull tight to close. Weave yarn tail into the body to hide.
See completed body in the image below.

Final assembly instructions
Step 1: Embroider nose and mouth (optional)
Using black embroidery thread and a needle, embroider a triangular nose onto the body. The nose sits between the middle of the eyes over R10 and R9 of the body. The mouth is embroidered by adding a line over R8 on the body coming down from the middle point of the nose. See the image below for placement.

Congratulations, you’ve finished Stevie the Sheep!

Congratulations on making your Eggy Farm Friend, Stevie the Sheep!
I hope you’ve enjoyed this crochet pattern, and I’d love to hear how you found it. Please do leave me a comment below and let me know your thoughts.
I’d also absolutely love to see a photo of your Stevie the Sheep. Simply upload a photo to social media and use the hashtag #CillaCrochets and tag me @cillacrochets. I’d love to share your creation with the community!
Until next time, happy crocheting,
Cilla x
© 2023 Cilla Crochets. Cilla Richards - All rights reserved. This pattern is for personal use only.
The pattern (or parts of it) may not be reproduced, distributed or resold, translated, published, altered, shared, or posted (for sale or for free) over the internet or offline.
You can sell items made from this pattern if they are handmade by yourself in a limited number and you give credit to the designer. Please add the following text to your item description for any item designed by Cilla Crochets/Cilla Richards that you are selling:
“This product is handmade by [your name] from a design and pattern by Cilla Richards at Cilla Crochets. See www.cillacrochets.com for more information.”